Input
Input is one of the most critical requirements in games, as it's used to drive all types of interactions with the game world, such as player movement.
In Godot, it's preferred to use the Project > Project Settings > Input Map dialog to define mappings between input keys or sequences and actions that are triggered when those input keys or sequences are triggered.
Orchestrator works directly with the engine's Input Map using an Input Action node.
The Input Action node is designed to return whether the action is triggered as an output pin, which can then be used as an input into other nodes that drive specific behavior.
Defining input mappings
Input mappings are defined in Godot using the Project > Project Settings > Input Map dialog.
In this screen, you define the relationship between a key press or input sequence and an action that should be toggled on when that key press or input sequence is detected by the engine.
For example, to define an action called move_forward to be triggered when pressing the W key:
- Open the
Input Maptab by navigating theProject > Project Settingsmenu. - In the Add New Action field, type
move_forward. - Press the
+ Addbutton to add the new action to the input map. - In the lower section of the dialog, find the action
move_forward, and press thebutton.
- In the Event Configuration pop-up dialog, press the
Wkey followed by clicking theOKbutton. - A child row will be added to the action that reads
W (Physical). - Press the
Closebutton to close the Input Map dialog.
Using an input mapping
Once an input mapping has been defined, you can use the Input Action node in an orchestration.
The Input Action node checks the current state of the action defined in the input map, and returns either true if the action is triggered; otherwise, it returns false.
To add an Input Action node:
- Right-click in the graph to open the All Actions dialog.
- Search for
input actionin the search box. - Select the Input Action choice and either press the Add button or simply hit the Enter key.
By default, an Input Action node does not default to any specific action, so it's important to set the Action property in the Inspector view.
See Setting the input action name for details.
Setting the input action name
The Input Action does not default to any specific action, so the action must be explicitly set in the Inspector view.
To set the action name:
- Select the Input Action node in the graph.
- Modify the
Actionproperty in the Inspector view by setting the action name, i.e.move_forward.
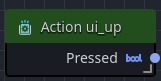
Input action trigger modes
Each Input Action node has a Mode property that describes precisely how the node should react to the action being triggered.
For example, if you want to react only when the user pressed the key that triggers the action in the current frame but not in any future frames, you may want to select Just pressed rather than the default of Pressed.
The following describes each mode and how it's interpreted:
| Input Action Mode | Description |
|---|---|
| Pressed | Returns true if the key or sequence that triggers the action is pressed. |
| Released | Returns true if the key or sequence that triggers the action is not pressed. |
| Just Pressed | Returns true if the key or sequence that triggers the action is pressed in the current frame only. |
| Just Released | Returns true if the key or sequence that triggers the action is released in the current frame only. |
Input action properties
To set the properties for an Input Action:
- Select the Input Action node in the graph.
- Open the Inspector view and modify its properties.
| Property | Description |
|---|---|
| Action | This is the user-defined action from Project > Project Settings > Input Map. |
| Mode | This defines how the action's triggering effect is recognized, whether pressed or released. |