Functions
Functions are graphs that belong to a specific orchestration that can be executed, or called, from another graph within the orchestration. Functions have a single entry point designated by a node with the name of the Function containing a single execution ouptut pin. When the function is called from another graph, such as the EventGraph, the output execution pin is activated causing the function's graph to execute.
Access specifiers
When creating Functions in an orchestration, there is no concept of public or private visibility. Any user-defined function on the orchestration can be accessed by any outside entity, including other scripts.
However, in Godot there is a general rule that functions that are private or not publicly accessible, are defined with a prefixed _ (underscore) character.
If you want a function to be publicly accessible, you generally omit the underscore.
While other engines like Unreal provide the ability to toggle function visibility, this is currently not available. We may choose to add this in the future if there is reasonable demand.
Creating a function
To create a Function within an orchestration:
- In the Component panel, press the button in the Functions section.

- Enter a name for the Function.
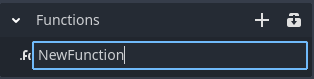
The Function will open in a new tab in the Graph Editor.
Editing a function
Once you have created a Function, you then need to define its functionality. This is a step-step process:
- Create the necessary input and output parameters.
- Add nodes to the function graph between the Functon Entry and Function Return node.
Once the function is created, you modify the details in the Inspector view. To open the Inspector view to modify the function, you can:
- Select the Function Entry node in the graph.
- Select the Function Result node in the graph.
- Select your defined function in the Functions panel.
Input and output parameters
You can set the input and output parameters in the Inspector view for the Function.
To add an Input argument:
- Modify the
Argument Countproperty in the inspector, setting a value greater than0. - For each
Argument ngroup, set the argument'sTypeandName.
To add an Output argument:
- Check the
Has Return Valueoption in the Inspetor. - A new property,
Return Typewill be shown, select the return value'sType.
Any changes made to the input or output configurations will directly be reflected in the Function graph. Once the appropriate input and output arguments have been specified, the Function is now ready for you to define its functionality.
Define functionality
A Function is defined by creating an Orchestration graph that connects behavior between the Function Entry and the Function Result nodes. In this example, we will create the necessary nodes to apply the 3D version of Pythagorean Theorem, returning the distance between 2 points in 3D space.
dx = (x2 - x1)^2
dy = (y2 - y1)^2
dz = (z2 - z1)^2
D  = sqrt(dx + dy + dz)
Representing this in an Orchestration may look like this:
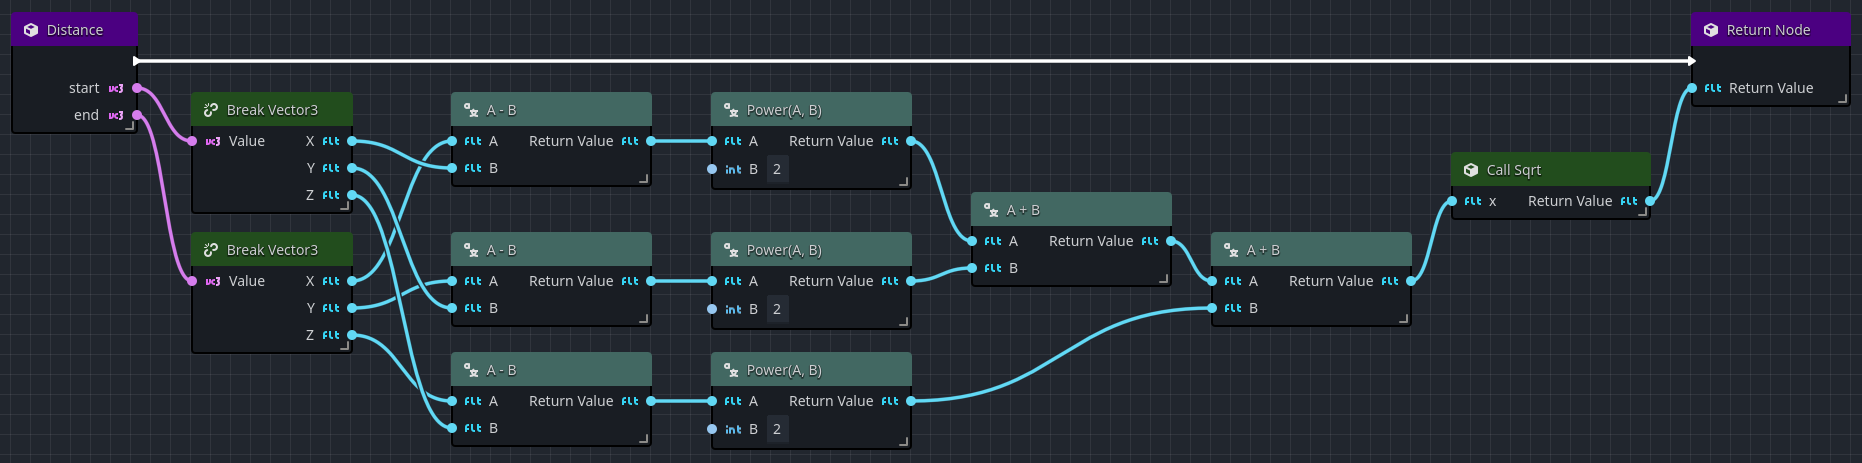
- Break the two
Vector3positions (startandend) into their respective(x1,y1,z1)and(x2,y2,z2)values. - Calculate the values for
dx,dy, anddz. - Add
dx,dy,dz, and then take thesqrtof that value. - Return the result using a Function Return node.
Calling functions
Once you have created and defined your Function, it is time to call it from within the orchestration. To create a node that will call your Function:
- Drag your Function from the Components view onto the graph.
- Right-click in the graph or drag from an appropriate execution or data pin to open the All Actions dialog. Search for your function, and select it to add the Function Call node.
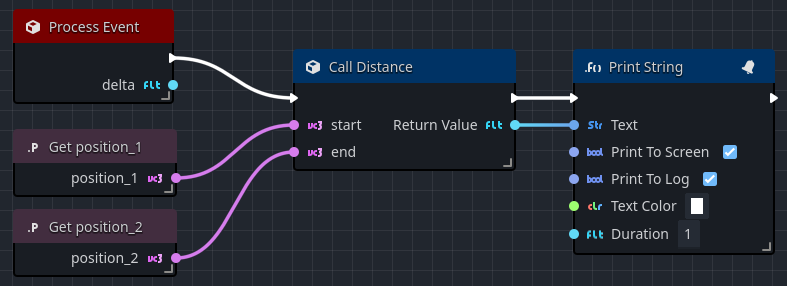
The graph below takes two vector variables, and on every tick, calculates the distance between the two and pints it to the screen.
Calling functions from external orchestrations
You can also call a Function in an Orchestration from inside another Orchestration, as long as you have a reference to the Orchestration that contains the Function.
Built-in functions
Godot provides thousands of functions, some which are global such as min or max, but most are functions that are associated with a specific object, such as Node.
Orchestrator uses the Call Function node to also call Godot's built-in functions.
To add a Godot built-in function:
- Right-click the graph to open the All Actions dialog.
- Search for the function you wish to call, such as
rotate_y. - Select the desired option, such as
Call Rotate Y. - To spawn the node, pressing the Add button or simply pressing Enter.
The number of input and output pins vary based on how Godot defines the function.
Variable argument functions
Some functions are called variable argument functions, or vararg for short. These functions are designed to take zero or more static arguments, followed by zero or more variable arguments.
In many languages, variable argument functions are defined like:
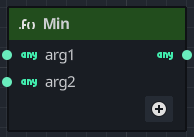
def min(Variant x, Variant y, Variant...) {
}
In this example, the min function accepts at a minimum two Variant values called x and y; however, the function may be called with additional Variant values if the caller wishes to compute the minimum across more than two values.
Orchestrator supports variable argument functions, and you can recognize these as they'll have a
If you decide at a later time that you want to remove a variable argument from the node, simply right-click on the name of the argument and select Remove pin.
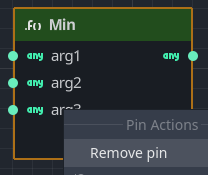
Only user added dynamic pins can be removed.
Method chaining
In text-based programming languages, method chaining is a technique to simplify code by calling multiple methods on the same object in a single line. In visual scripting tools, method chaining is not as common, but Orchestrator supports method chaining by allowing you to connect the output of one function to the input of another.
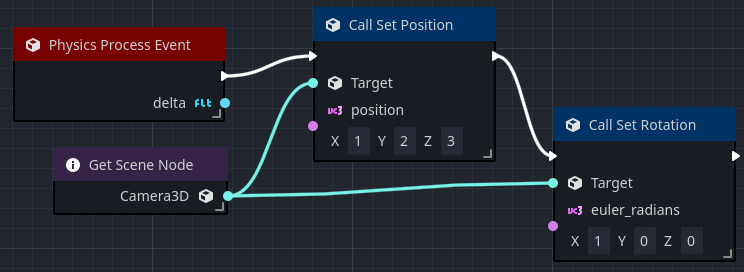
For example, in the following graph, we are applying a position and rotation to the camera. You will notice that we have to not only call Set Position and Set Rotation, but we have to link the Camera node to each function call. If you were to add additional steps that you needed to perform on the Camera, you would begin to have a spaghetti of connections.
Now, thanks to method chaining, you can connect the target output to the input of the next function call.
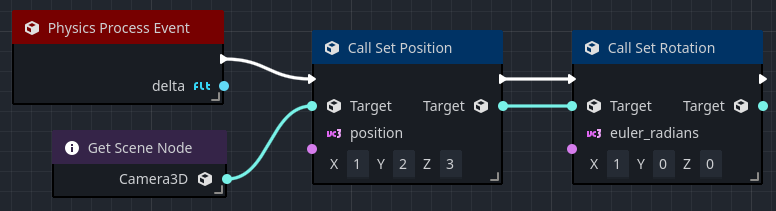
This makes the graph easier to read and understand, as well as easier to maintain.
To enable method chaining:
- Click the Call Function node.
- Open the Inspector view.
- Check the
Chainoption.

Once enabled, a new output pin labeled Target will appear, allowing you to chain the functions together.