First look at the plug-in
This page will give you a brief overview of Orchestrator's interface. We're going to look at the main workspace, the integration with Godot, and its intuitive integrated class reference subsystems.
The main workspace
You access the main workspace of the plug-in by clicking on the tab labeled Orchestrator at the top of the Godot Editor.
Graph view
Initially, the main workspace is empty, only showing the file list.
This is because no Orchestration resources have been opened.
By either creating a new orchestration using File > New Orchestration, or opening an existing orchestration, the main workspace will include other widgets.
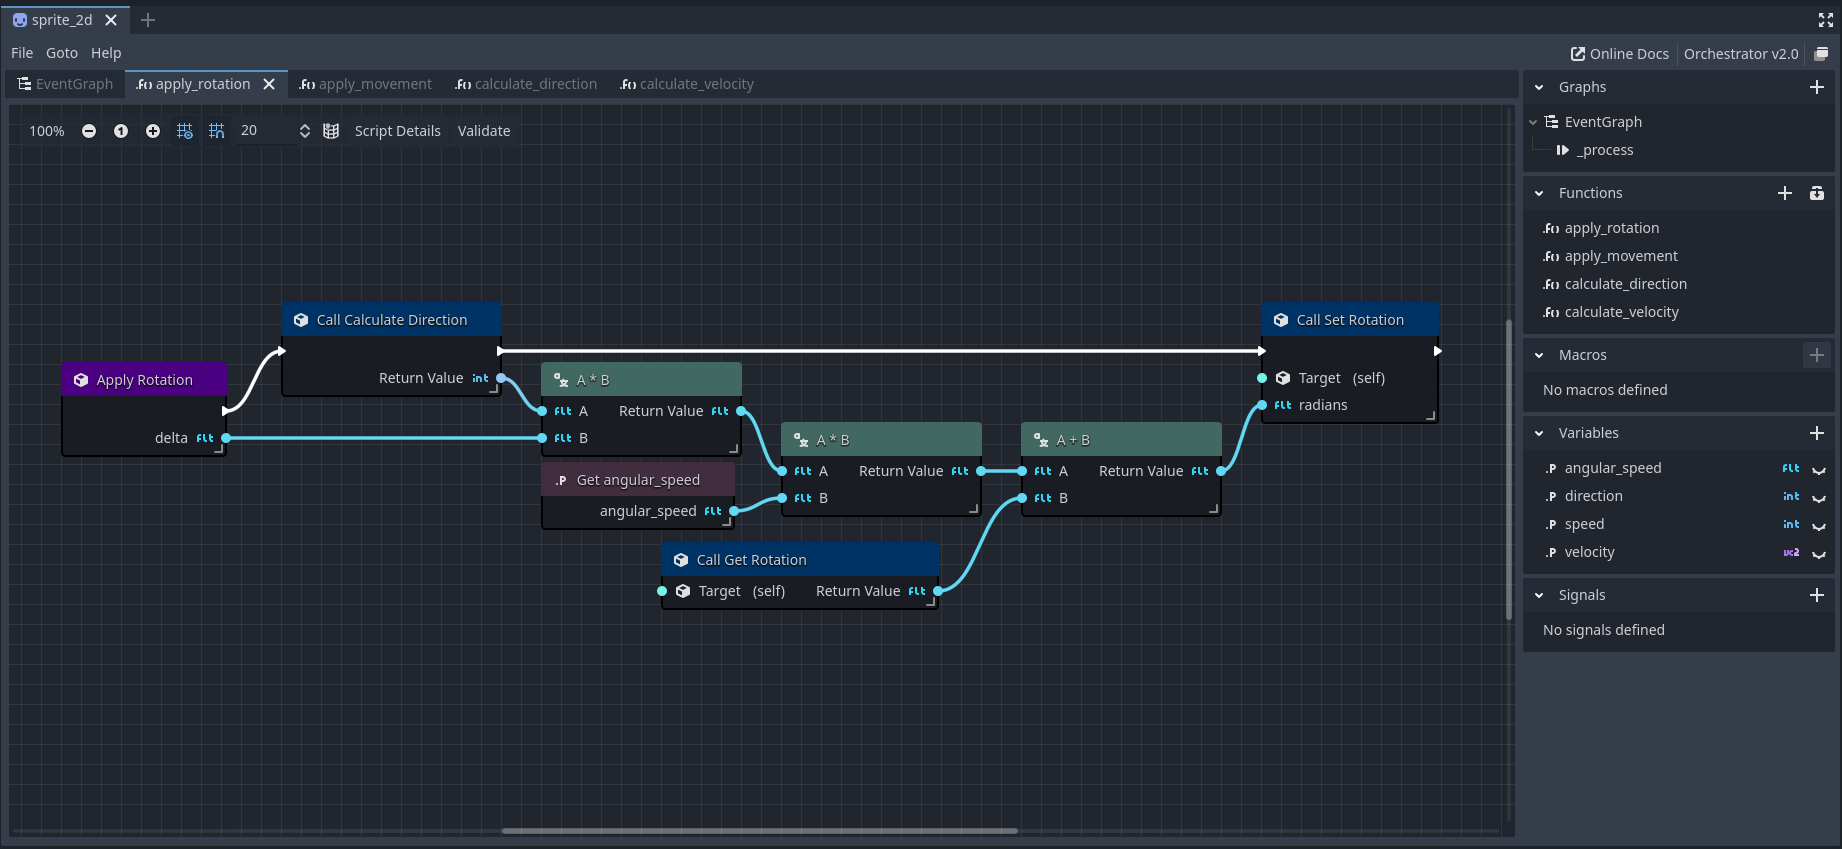
In the above example, an orchestration has been opened. To the left is the Graph canvas where you place visual script nodes to create logic. At the top of the Graph, there is a tab bar, where you can quickly navigate between different Graph components or user-defined Functions.
On the right is the Component view, where high-level components can be added.
Component view
The Component view is where you can quickly add, rename, and remove various components from the orchestration.

-
The Graph section always defines at least one graph called EventGraph. This is where you will define all your interactions with the Godot engine to handle overrides, such as when your script receives input or updates each game tick.
-
The Functions section allows for defining user-defined functions. User-defined functions are a great way to not only expose functionality to the outside of your script, but to also organize your code so that the visual scripts do not become cluttered.
-
The Macros section is currently unimplemented, and will be enabled in a future patch.
-
The Variables section allows creating unique named objects for storing values. Variables are associated with a specific Godot type and can be publicly accessible or scoped to the script. A variable will be publicly accessible if it has the
icon. This means that the variable is exported, in Godot terms. The variable is not publicly accessible when using the icon. This means that the variable is not exported, in Godot terms.
-
The Signals section is for user-defined signals, allowing outside observers to connect and be notified when you emit a signal.
To add a new Component type to the Orchestration, use the
All actions dialog
To begin adding logic to your script, use the right-mouse button to open the All Actions dialog.
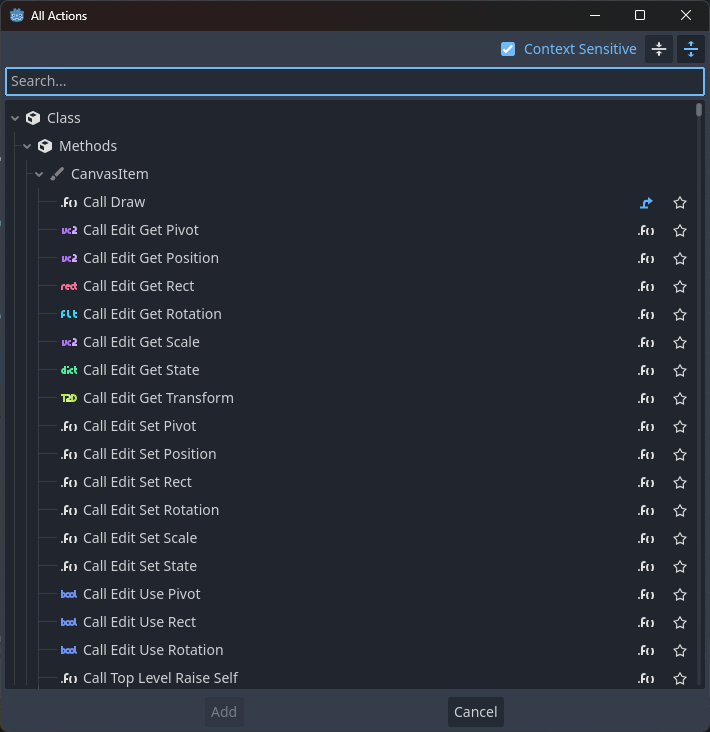
This dialog is where you can search for specific nodes that you wish to add to the graph. To add a node, either select the choice and press the Add button or simply press Enter.
Actions are grouped into the following high-level categories:
- Functions that you can call on the object, denoted with the icon.

- Properties that you can access, denoted with the icon.

- Signals you can connect and react to, denoted with the icon.

- Overridable functions, denoted with the icon.

- And Orchestrator script nodes, denoted with the icon.

The
Right-clicking the graph canvas opens the All Actions dialog using the script's base type as the context. If you drag from a visual script node's pin and release the mouse, the All Actions dialog will be opened using the context of the pin.
Visual script nodes
All orchestration scripts are comprised of various visual script nodes. A visual script node is the building block of an orchestration, that you connect with other script nodes to build behaviors.
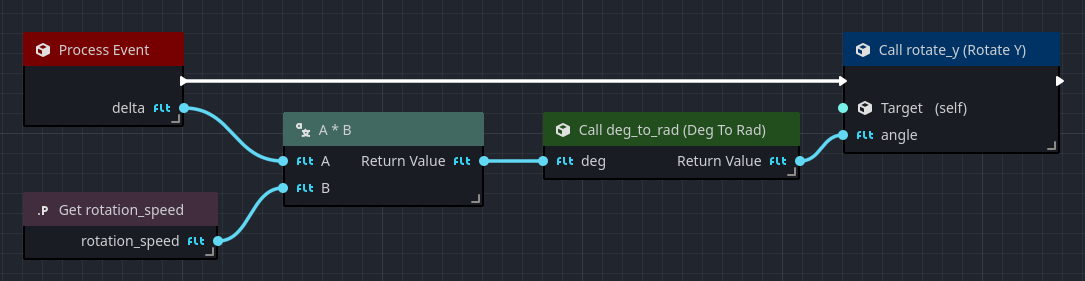
Script nodes consist of two types of pins,
- Inputs
The pins on the left side of a script node are called inputs, which allow you to pass data or control flow to the node. - Outputs
The pins on the right side a script node are called outputs, which allow you to pass data or control to another node.
Visual script nodes can be added to an orchestration using various methods, which include:
- Opening the All Actions dialog
- Or by dragging from various editor docks and the Component Panel.
For details on all the script nodes available, please see the Script Node Reference.
Customization and configuration
Orchestrator also provides a number of customizations inside the Project > Project Settings > Orchestrator section.
Settings
The Settings subsection provides access to several global Orchestrator settings.
Base Settings
| Setting | Description |
|---|---|
| Default Type | The default class type to be used when creating new orchestrations, defaults to Node. |
| Log Level | Specifies the logging level when writing to user://orchestrator.log, defaults to INFO. |
Runtime Settings
| Setting | Description |
|---|---|
| Max Call Stack | The maximum possible number of Variant (data) slots to allocate per stack, defaults to 1024. |
| Max Loop Iterations | The maximum number of loop iterations, before a loop is auto-terminated, defaults to 1000000`. |
| Tickable | Whether or not Orchestration scripts have their _process functions called, defaults to true. |
UI (User interface)
The UI subsection provides access to many user-interface controls used by Orchestrator.
Action Menu
| Setting | Description |
|---|---|
| Center on Mouse | Whether the All Actions dialog opens centered at the mouse click, defaults to true. |
Nodes
| Setting | Description |
|---|---|
| Show Type Icons | Whether the data pins on nodes show the icon types, defaults to true. |
| Highlight Selected Connections | Highlights any nodes connected to any selected nodes, defaults to false. |
Node colors
In this section, you can customize the colors used for different node type title bars.
Connection colors
In this section, you can customize the data pin and wire connection colors for each data type. By default, Orchestrator maps the connection and data pin colors to match the Godot data type icon styles.
Seamless editor integration
One of the major goals of the Orchestrator team is to make sure that the user experience is seamless with the Godot Editor. We want users to feel as though the plug-in is a fundamental, core part of the Editor. To achieve this goal, not only do we do our best to follow the same design principals of the Editor, but we also provide seamless integration with the Editor.
Drag-n-drop anywhere
One of the major benefits of Orchestrator is it recognizes data elements that are from other parts of the Editor interface.
The following drag-n-drop options exist:
- Drag a scene node from the Scene view to get a reference to that scene node in the script.
- Drag a property from the Inspector view to access either a Get or a Set for the specific property.
- Drag a resource from the FileSystem view to either obtain its path or to create a Preload node for the resource.
Multi-node operations
Bulk operations improves efficiency, and having access to such tools makes working with visual scripting less tedious. You can use the Left Mouse Button to click on the graph and begin to drag to select multiple script nodes.
With multiple node selected, you can
Ctrl+X), Ctrl+C), and Ctrl+V) as needed.
You can also quickly
Ctrl+D, which is a shortcut for copy-n-paste.Undo and redo
At this time, Orchestrator does not officially support Undo/Redo operations in the Godot Editor.
This feature is currently under development and is planned for a future release.
File formats
Orchestrator supports two file formats:
.torch, which is text-based.oswhich is binary-based.
The text-based format was introduced with Orchestrator 2.1, and will be the default moving forward. This format is more human-readable and is easier to work with version control systems, as text-based files allow for significantly easier diffing between changes. The binary-based format was originally introduced with Orchestrator 2.0, and is planned to be deprecated in a future release.
Converting between formats
In order to convert from one format to another, simply follow these steps:
- Open the desired orchestration. This can be performed by double-clicking the file in the Filesystem Dock by using the Orchestrator plug-in's File menu by selecting Open Orchestration.
- Click on the File menu and select Save As.
- In the Save As dialog, provide a new file name with the desired format extension (
.osor.torch).
When converting an Orchestration between formats, the scenes that import and use the Orchestrations are not automatically updated. You will need to open each scene that uses the Orchestration and re-attach the new Orchestration file that uses the new format you selected.
If you want to change the default format used by the plug-in, this can be done in the Project > Project Settings dialog.
Simply open the dialog and navigate to the Orchestrator > Settings section where you will find the Storage Type configuration option.
Here you can select between either Text or Binary, which controls the default format used when creating new Orchestrations.
Exporting games
In a Godot project, not every resource is exported in the same format that it's saved with in the project workspace.
This is because often times resources are saved using human-readable formats in the project workspace, but are converted to a binary format when the game is exported for performance reasons.
Several built-in Godot resources are converted to binary when exporting games, such as .tres and .tscn files, which become .res and .scn, respectively.
Orchestrator also uses this same technique when the project's Orchestration is storede in text-based format with the .torch extension.
During the export process, the .torch file is converted to a compressed, binary format using the .os extension, which greatly reduces the file size and speeds up game load times.
When exporting a game, any .os binary format that is used in the project is exported as-is without any transformation.
This is because the binary format is already in a compressed format that is suitable for fast game loads.
Integrated help
You can access the documentation related to any visual script node by selecting the node, right-click, and selecting the